
Negative Lab Pro Review
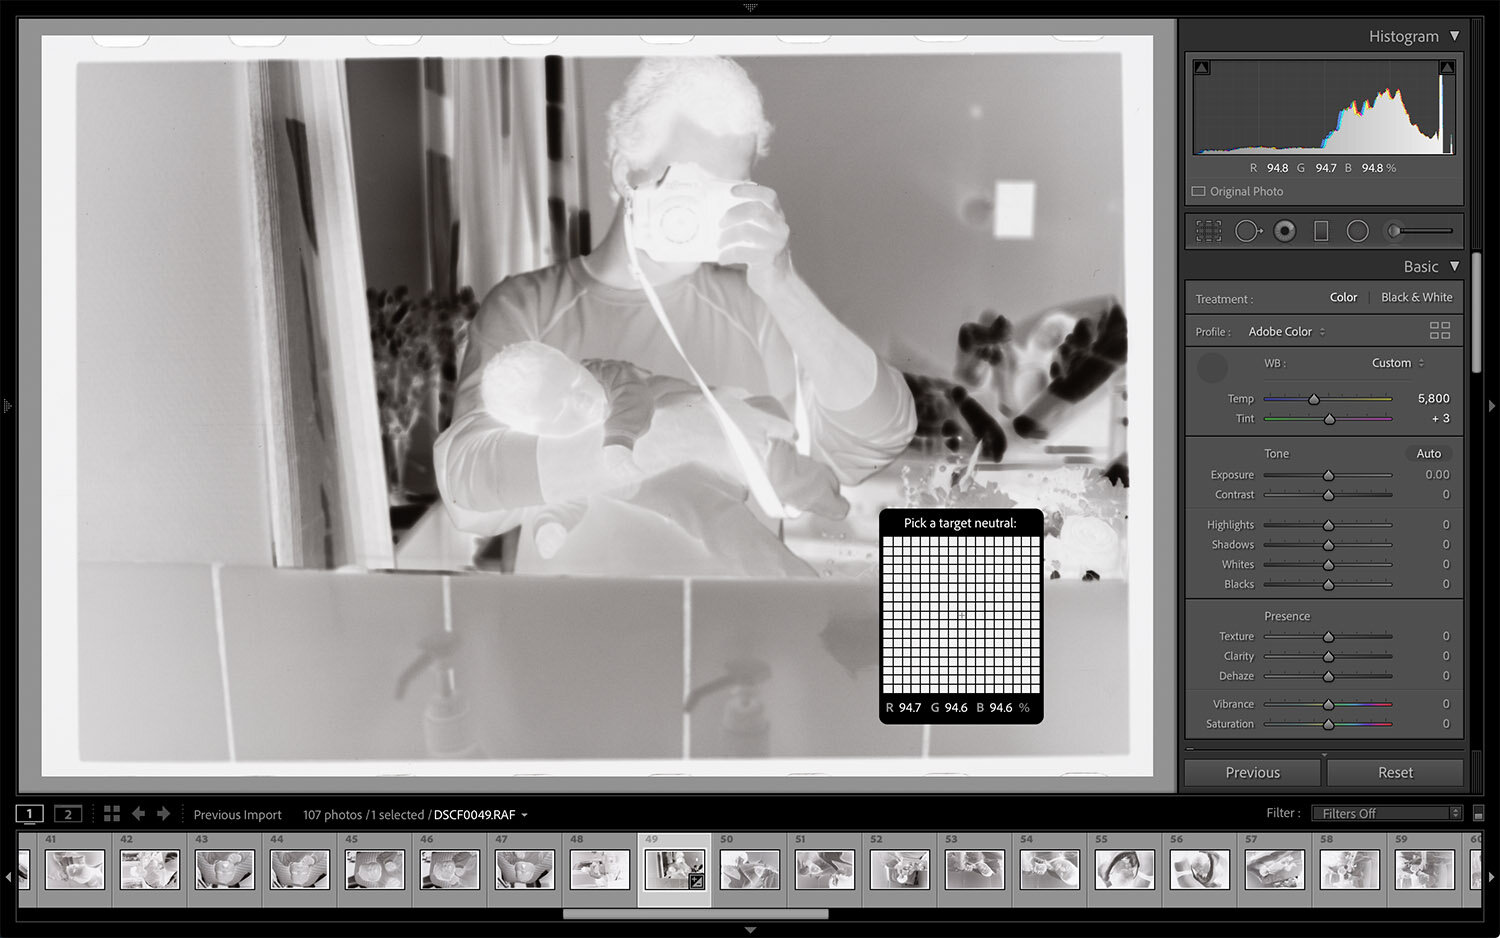

Converting a black and white image using Negative Lab Pro
Workflow Using Negative Lab Pro Lightroom Plugin
When researching ways of copying my negatives to a digital format I stumbled upon Negative Lab Pro, a Lightroom plugin giving users an easy way to convert color or black-and-white negatives in Lightroom to a digital format.
The science going into to conversion of color negatives can be especially challenging and this is where Negative Lab Pro shines.
I reached out to Nate at Negative Lab Pro and he kindly provided me with the software for this review. I have been using Negative Lab Pro for a couple of months now for 35mm and medium format color and black and white negatives.
Black and white photo converted using Negative Lab Pro. The photo was captured on Kodak 5052 TMX using a Canon T90 with an FD 35mm f/2.8 and perhaps, more importantly, it’s my son and wife in the background of this selfie attempt from 1990.
Why Negative Lab Pro
I came to the decision to go with Negative Lab Pro after contemplating how I wanted to copy negatives.
A few years ago I copied many of my slides using a digital SLR and a macro lens. Editing was done in Lightroom and I was really happy with the result. I knew I wanted a similar setup but working with negatives presents new challenges and I hoped Negative Lab Pro could be the final puzzle piece in my workflow.
I have chosen to use my Fujifilm X-Pro2, a Nikkor 60mm f/2.8D macro lens, and a Skier Sunray Copybox 3 which gives me RAW files to work with.
As opposed to learning new software and using a flatbed scanner I wanted to use Lightroom with a workflow I was accustomed to. Please note I am not against flatbed scanners. The workflow just didn’t seem appealing to me.
A Fujifilm color negative coverted using Negative Lab Pro.
Check Out The Video at Negative Lab Pro!
I will admit the color science behind the Negative Lab Pro Lightroom plugin goes beyond me and I am just happy there are people out there who have the talent and know-how it takes to create these helpful solutions.
I strongly recommend checking out the video at Negative Lab Pro along with the comprehensive user guides. The site also has a user forum where I picked up a few ideas for my negative copying setup.
I was in the Negative Lab Pro forum I first came across the Skier Sunray Copybox 3, which I also have incorporated into my workflow.
Stanley Park Seawall at Coal Harbour, Vancouver. Hasselblad 503CX, Kodak Portra 160 converted using the Negative Lab Pro plugin in Lightroom.
Seven Steps With Negative Lab Pro
Without going overboard with detail, below I will describe the steps I take with Negative Lab Pro.
Import photos
Set white balance
Crop
Convert photos
Tweak photos using Negative Lab Plugin or Lightroom
Export photos
Admire your final results :)
1. Import Images
I have chosen to copy negatives using my digital mirrorless camera but you can also import images copied on a flatbed scanner. Import the photos/files into Lightroom as you would with any other photos.
Step 1. I leave a border around the images I have captured with my Fujifilm X-Pro2. After you capture a roll or any number of negatives, you import the photos to Lightroom.
2. Set the White Balance
In order for the Negative Lab Pro plugin to accurately analyze colors in your negatives, you want to use the white balance tool in Lightroom. Simply measure the white balance on the film strip between the frames, or above/below.
I have had issues with some of my negatives, which I may have overexposed slightly. The border areas were too bright and Lightroom would give me an error that the images were too bright to measure the white balance. In most cases, I just tried different areas of the negative until one spot would work.
Step 2. Sample a point along the white border of the negative to nail the correct white balance
3. Crop the Image
Crop your image. You can choose to leave part of the film border in place or crop into the photo to eliminate the border if you prefer. The plugin allows you to estimate a percentage point for how much of the border area Negative Lab Pro should ignore when analyzing the photo before converting the file.
Step 3. Crop your photo to your liking. You can leave some of the film borders in or crop it out.
4. Convert Photos
Press Control N to open the dialog window to convert the negatives. You can choose from different color model scanners or BW for black and white conversion. You can do a single image or your entire roll as a batch. Simply select “all photos”, then press Control N.
Step 4. It is time to the convert the photos.
5. Tweak / Edit Photos
You can use the Negative Lab Pro plug-in to edit the photos after they have been converted. Press Control N again to do this. The Tones tab is excellent for picking a suitable hardness or softness to highlight or shadow areas and so far I have been able to find a good match in this drop-down menu for my photos.
You have sliders to control brightness, contrast, lights, darks, whites, and blacks. Further to this, you have ample selections for white balance tools with LUT presets, or choose to go custom if you would like. I encourage you to try the options out to see what you like.
5. Edit your photos using the Negative Lab Pro plugin
6. Export Photos
Export your photos from Lightroom with your desired presets for compression and size.
7. Admire Your Masterpiece
The photo used in this example is from 1992 and as far as I recall, it was captured using a Canon EOS 1 with an EF 20-35mm f/2.8L lens on Kodak Ektar 100 negative film. I believe I used a flash bounced on the ceiling of this otherwise dark staircase in Copenhagen, Denmark.
I picked it, in part because it was the last roll of film I copied but also for the rich detail and bright reds and blues which I think come through nicely.
See the final edit after cleaning it up in Photoshop using the spot healing brush tool and the dodge tool to lighten the darker areas in the image. It is my nephew and son in this photo, both grown men by now :)
The final edit of a photo converted using the Negative Lab Pro plugin for Lightroom
Negative Lab Pro - Conclusion After Two Months
The final puzzle piece is in place for my workflow of copying negatives. Negative Lab Pro has lived up to expectations and, at this point, I have not discovered any serious shortcomings except perhaps for the missing undo function while editing within the plugin. At Negative Lab Pro, they have a free 12-photo try-out if you are interested.
Be prepared to see different results from various film stock and I will stress this again. Check out the user guide from Negative Lab Pro which has dozens of good suggestions that will make a difference in your final result.
In wrapping up I will share some of my favorite images converted using the Negative Lap Pro plugin over the last couple of months. Some of the images date back to the fifties, and nineties and some are recently captured with either my Canon AV-1, Nikon EM, Agfa Silette, or Zeiss Ikon Ikoflex. Three photos from each camera.
Negative Lab Pro Sample Images


Update: November 2022
A new version of Negative Lab Pro (v2.4.1) has now been released
and includes MAJOR improvements and new features!
Update: November 2022
A new version of Negative Lab Pro (v2.4.1) has now been released and includes MAJOR improvements and new features!
What is new in v2.3:
Improved color fidelity (New Raw Profiles)
Tonal smoothness control
Batch navigation
Lab glow / Lab fade
Before/after editing toggle
Exposure control
Positive copy options
And much more
You can get the update at Negative Lab Pro
My reviews at a glance: Camera Reviews - Archives